Looking for Something?

Showing posts with label Mains. Show all posts

Monday, 19 August 2013

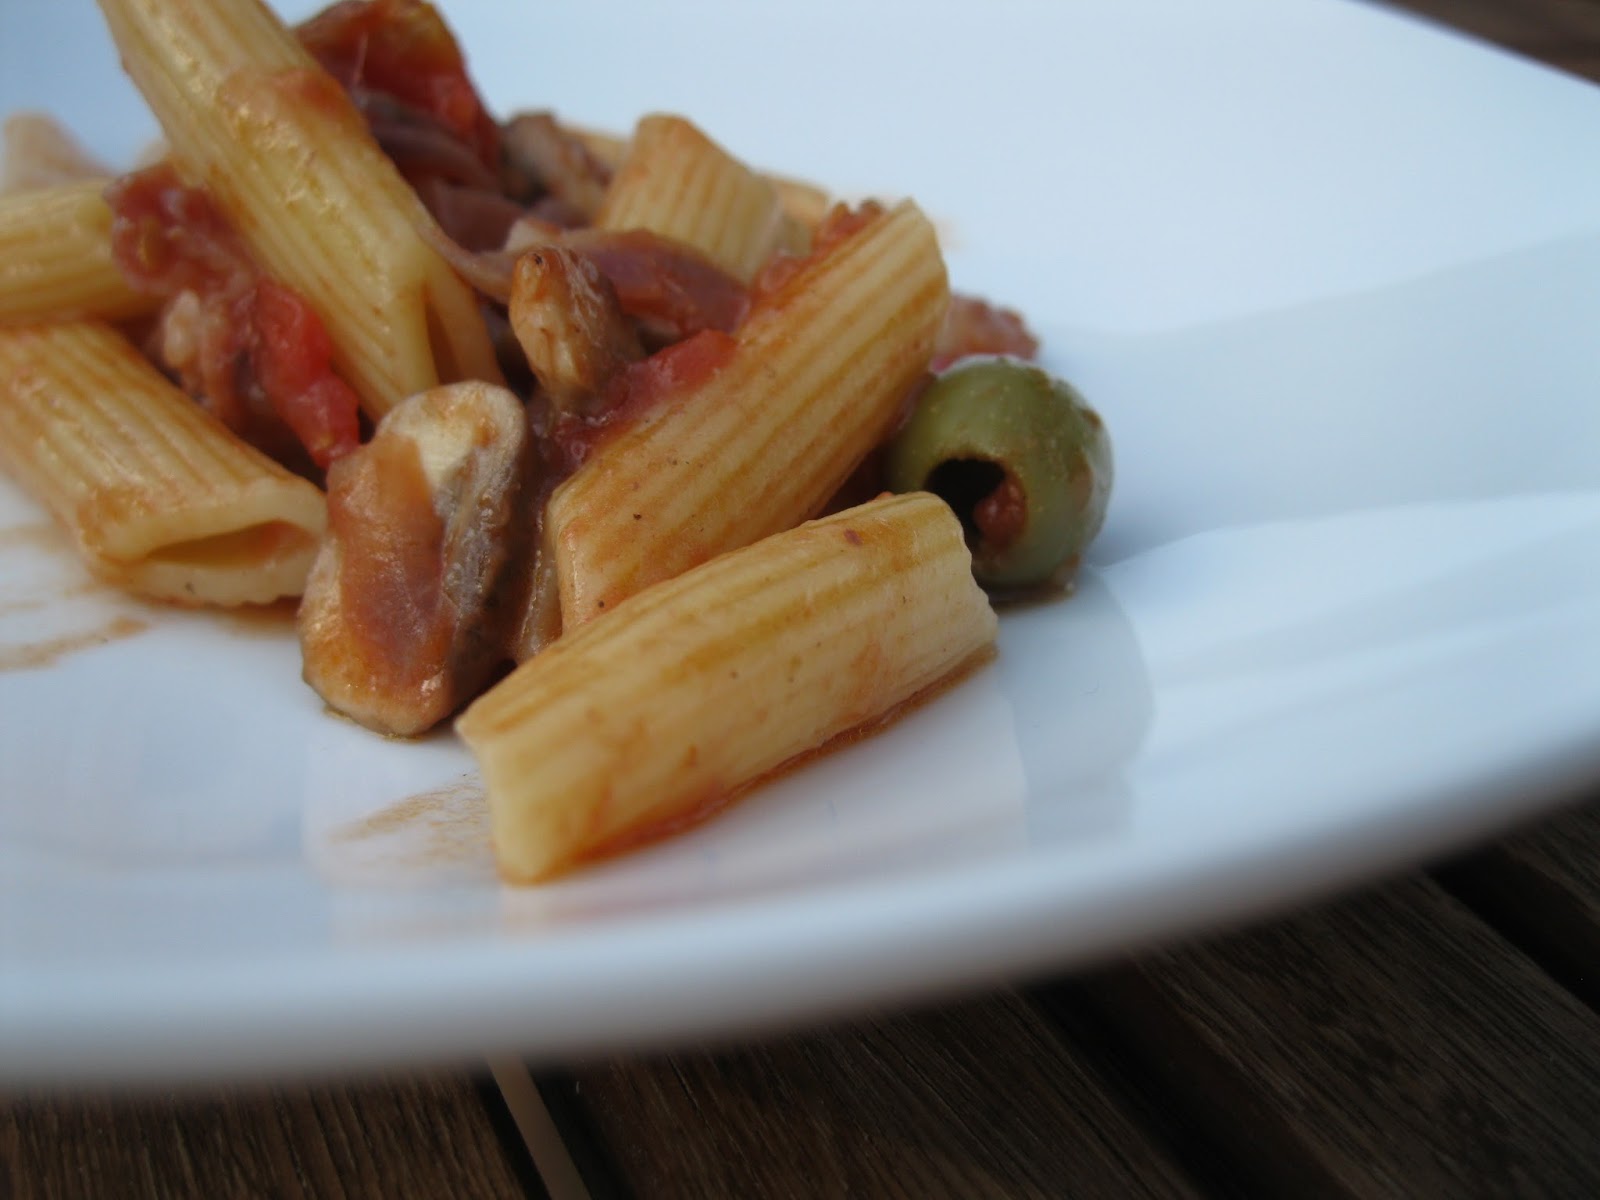
Quick Summery Pasta with mushrooms, olives and anchovies


 You know the feeling, when you are engrossed in something and look up only to see that the time has flown by, it is quarter to five and dinner is usually on the table at five o clock sharp (give or take) if you want to have the kids in bed on time to have any semblance of an evening to yourself. When you find yourself in that same situation, this is the dinner for you! It can be on the table in around 20 minutes flat and tastes delicious. Of course, this is not only a dinner to be slapped up in a rush, it would work equally well cooked up for a longer, more languorous lunch or dinner coupled with warm garlic bread to soak up the juices and a glass or two of red, on those long, balmy summer evenings. Need I tempt you any more?

Serves 4

Ingredients:

1 Red Onion sliced
250g Chestnut Mushrooms
Handful of Olives - whichever you have will work, even the stuffed ones will add more flavour.
5 Anchovies (From a tin, in oil. You can freeze the rest or keep in the fridge in an airtight container ensuring they are submerged in the oil for a couple more days)
4 Thick rashers of Bacon diced (or Pancetta)
Oregano (About 4 stalks worth of leaves chopped, fresh if you have it or a pinch of dried)
1 Tin Chopped Tomatoes
2 Cloves Garlic crushed
2 tbsp Olive Oil
250g Pasta (Spaghetti works best, but I used Penne as the children find it easier to handle, the choice is yours)

How to:

1.  Put the pasta on to boil as per packet instructions.
2. Heat the oil then saute the onions, bacon and mushroom until soft, about 10 minutes.
3. Add the garlic, olives and anchovies and heat through. Break up the anchovies with a wooden spoon as you do so although they will melt down as they cook. Do this for about 5 minutes.
4. Add the tinned tomatoes and the oregano and reduce down until you have a thick sauce.
5. Drain the pasta reserving some of the starchy water. return it to the pan along with the tomatoey sauce and give it all a good mix up. Add a little of the water if it seems a bit dry.
6. I take it to the table with a large ladle and let everyone tuck in. This was a great success with the girls with little E calling out for 'more peese mummy' twice, no less once her bowl was empty!


Wednesday, 8 May 2013

Big Party Vegetarian Lasagne


 It is party time again, yes, P is turning 4 and to celebrate we are having the usual crowd of family and friends. It seems so much nicer to have the opportunity to get everyone together to celebrate and have a good old catch up. But there is always the questions of what to cook. Many guests are coming from far afield so will need something to keep them fueled up for the day. There is always the questions of whether to go for sandwiches and a buffet of to go with a couple of big dishes. I think the big dishes win hands down every time, they tend to be quicker, less fiddly and thoroughly enjoyed as well as being cheaper than supplying a big selection. I scoured the internet this year for BIG recipes to feed a party but mostly found those around 10 portions. With 40-50 guests this just would not do so I adapted a number of recipes to make one of my own and here it is. Yes, the bowl was cleared, entirely and in all honesty I probably could have done with two of these! Alongside the Lasagne was a meat Chilli-Con-Carne. Both these dishes are great as they can be easily accessorised with copious amounts of Garlic Bread and large Salads.

Big Party Vegetarian Lasagne

2 Aubergines
2 Courgettes
3 Peppers: Orange, Red, Green
250g Mushrooms
3 Cloves Garlic
2 Tins of chopped Tomatoes
1 Red Onion
1 White Onion
Dried (or Fresh if you have it) Oregano
Dried Italian Herbs
Olive Oil
25g Butter
25g Flour
1 pint Milk (600ml)
Grated Cheese (Mature Chedder or your favourite)

1. Cut the Aubergines, Courgettes, Peppers and Mushrooms into small chunks (about 1cm cubes) and toss into a large baking tray.


2. Drizzle over the Olive Oil, you can be quite liberal as it will be absorbed by the veg, and sprinkle with the dried oregano quite liberally. Bake in the oven at 180 degrees Celsius until tender which should take around 35-40 minutes.


3. Meanwhile soften the Onions in some Olive Oil in a heavy based pan. You don't want them to colour. This should take around 5-10minutes, then add the garlic and soften, around 5 minutes. Sprinkle with the Italian herbs then add the tinned tomatoes, 2tsp of sugar and cook through.


 4. Add the roasted vegetables to the tomato sauce and get them coated. If the sauce is too runny cook for a little while to reduce and thicken.

5. Make the white sauce, don't worry, it is not hard. You need to use a heavy based pan or the bottom will burn and don't get distracted stir regularly to stop the bottom sticking and burning. Melt the butter in the pan. Sprinkle in the flour and stir, cook for a couple of minutes to get rid of any floury taste. Take off the heat and pour in the milk slowly, whisking all the time until it is smooth. Bring to the boil slowly whisking all the time and boil for about 10 minutes to thicken. Season with salt and pepper.

6. Line the base of the baking dish with pasta and cover with about one-third of the vegetable mixture. Cover with a layer of the white sauce and top with another layer of lasagne sheets.

7. Continue until you have a layer of white sauce. Cover this with grated cheese.

At this point you can leave to cool, cover tightly with cling film and freeze until ready as I did. This really help to have some prepared in advance. It will need about 24hours to defrost before cooking at 180 degrees celsius for about and hour or until hot through. Taking out of the oven and wrapping in foil and towels keeps this hot for a while too.


Sunday, 21 April 2013

Hearty Smoky Bacon and Chicken Chowder

When you have a busy day running around dropping children off at various activities and picking up needing to be in about 3 places at once, you know the feeling I am sure, all you want to do at the end of the day is slip your shoes off and settle down around the table to a comforting, warming filling soup. This really recharges the batteries served with some warm, fresh, crusty bread, dripping with butter  which is just crying out for a dunking. When the aroma of this cooking starts to fill the house, the table will never have been occupied quicker!

Hearty Smoky Bacon and Chicken Chowder

100g Cooked Smoked Chicken, diced
100g Smoked Pancetta
Olive Oil
1 Onion
1 Stick Celery
1 Large Potato diced
800ml Water
100g Sweetcorn (tinned is fine)
100ml Single Cream

1. Fry the pancetta until crispy and set aside on kitchen paper.
2. Sweat the onion and celery for as long as possible, this gives the great flavour. At least 5 minutes until soft but not brown.
3. Add the potato and water and simmer until the potato is almost cooked. About 10-15 minutes.
4. Add the sweetcorn and cook for a further 5-7 minutes.
5. Add the chicken, bacon and cream and stir through until completely warm. Add pepper to taste but salt won't be needed.

I usually blitz with a stick blender at the end of step 4 to have a smooth soup with bacon and chicken bits in. Of, course you could also blitz the whole lot at the end if little ones prefer a smoother consistency or even at the end of step 3, to leave whole sweetcorn which bursts with sweetness in each mouthful. The choice is yours, so long as you give it a go!

Stir Fry with my Chinese Kit!


This is such a quick throw it together dinner that really takes just minutes and you just know it is healthy. I have my little Chinese kit which I whip out every now and then when I need a something quick with lots of flavour. This consists of five-spice paste, soy sauce, fish sauce and sesame oil. This is the basis of all of my chinese dishes. I will also use fresh lemon or lime if I have it, sometimes peanut butter and depending on taste, chilli flakes.

Here is my quick and tasty stir fry, well one variety anyhow:

3 Chicken Breasts cubed (not to large, for quick cooking)
1 tsp Five-spice paste
1 Table Spoon Soy sauce
1 tsp Fish Sauce
4-5 drops Sesame oil
Vegetable Oil
2 tbsp Peanut Butter
1 Lime
Chilli Flakes (to taste)
3 Noodle nests (1 per person)
1 pack fresh stir fry vegetables

1. Heat the oil in a large wok. Use vegetable oil rather than olive oil as it reaches a higher temperature for quick cooking. My favourite is Rapseed Oil, it has a great taste, amazing colour and is lower in fat than Olive Oil!
2. Add the Sesame oil, fish Sauce, Chilli, Peanut Butter and Five-Spice Paste, stir quickly than add the chicken. Keep moving around the hot Wok until coloured and coated in the aromatic flavours.
3. Add the vegetables and the Soy Sauce. At the same time boil the noodles for 3-4 minutes.
4. Stir Fry quickly in the hot pan until all cooked through.
5. Serve and eat with fresh lime squeezed over! Sometimes I like to toss the noodles into the vegetables to get them all coated in the delicious flavours also. Just a reminder of how good


Monday, 8 April 2013

Hubby's Moules Mariniere


Hubby has donned his apron tonight and produced a culinary treat. Unfortunately, I was barred from the kitchen as he got into the zone to whip up this delicacy. I couldn't let the opportunity pass to post this however, as it really was delicious and was very quick. 

Mussels are quite widely available in most supermarkets, but are even better from a local fishmongers or freshly caught from a market. Read the instruction carefully about how to prepare and which to eat and which to discard. But don't be afraid, they really are quick, easy and scrumptious. Great served with a crusty loaf to soak up all those creamy, garlicky juices. This is probably not one for the kids though as a bit boozy. Check out the tried and tested recipe on the link below.
 

Quick and Easy Pungent Paella (Chicken and Chorizo)


I absolutely adore this dinner and cannot survive with out eating this at least once a month. This time it was the perfect dish to serve for a dinner with friends as it is very quick and very easy and doesn't take too much looking after. The first time I cooked this I made the little ones their own variation, with a little onion and garlic sauteed in butter before adding some paella rice, frozen peas, half a stock cube (low salt) and some water. This ended up being a fruitless activity however, as they tucked into ours and were not all interested in their own!

Please give this a go, it is amazing!

Pungent Paella

Olive Oil
Salt and Freshly ground Pepper
1 Onion
2/3 Skinless Chicken breasts cut into chunks
150g Chorizo cut into cubes
300g Arborio/Paella Rice
150ml Dry Sherry or make this up with stock if you prefer
2 Cloves Garlic chopped/ pressed
2 Pinches Paprika
Pinch of Saffron (if you have it, but it does give amazing flavour)
Knob of Butter
400ml Chicken Stock
250g Prawns (Raw are better but if you don't want to de-vein etc just go with the pink ones and cook for less time so they don't get tough)
150g Frozen Peas
Lime or Lemon Wedges to serve
1. Heat the oil in a large flat based pan (i.e a frying pan). Saute the onion until soft but not coloured.

2. Add the chicken and chorizo and sizzle with the onions. The bright orange colours will be released from the chorizo to coat the chicken and onions.
3.  Throw in the garlic and paprika and cook for a couple of minutes. Take the pan off the heat to cool a little then add the Sherry and boil rapidly to cook off some of the alcohol.

4. Add the rice, butter, saffron and stock. Turn down the heat and simmer for about 30 minutes until most of the liquid has been soaked up by the rice. Don't stir as you want the rice to stick a little on the bottom for the crunchy, nutty flavour. About half way through cover the dish either with a lid or some foil.

5. When the rice is nearly cooked add the prawns and peas and re-cover to cook through until the prawns are piping hot.
I like to take the whole thing to the table for everyone to dive in. Serve on warm plates with a crusty buttered loaf and a chilled glass of crisp white wine!

It really is a good as it looks! Give it a go and enjoy.

Big Nan's Traditional Indian Gosht (Lamb) Roganjosh Curry


 This is my Nan's recipe she brought over from India with her. Although, originally of British origin, due to travels of the British Empire my family settled in India for many years before returning to England in 1976. With them they brought the key to amazing, aromatic curries which are spicy but not hot. They have a lot of flavour but the whole family can enjoy them as they are not heavy on the Chilli, of course if you like it a bit hotter, just add a bit more chilli power to taste. They also brought over an array of 'Anglo-Indian' Curries and dishes which are neither English or Indian but something of a mix between the two. 

This curry is cooked slowly (it could be done in a slow cooker) but doesn't require a great deal of time or effort as it pretty much cooks itself. The slower cooking intensifies all of the flavours and helps to develop the thick sauce. There are quite a few ingredients, but they are easy to source, being stocked in most large supermarkets and once you have your curry kit, you, like me, will be addicted and will need to use it regularly!

Big Nan's Traditional Indian Gosht (Lamb) Roganjosh Curry

A knob of butter
2 Onions chopped
500g Cubed Lamb
4 tbsp Tomato Puree
4 Cloves Garlic crushed
4 New Potatoes in quarters
50g Fresh Ginger 
 (I use a micro grater to grate straight in, I didn't even peel. If you do want to peel, use a  teaspoon to scrape the skin off, it's the quickest way)
1 tbsp Garam Masala  
(You can find this in the dried herbs and spices section of the supermarket in little jars or if you happen to live near any Asian food shops it is widely available and much cheaper. It is a blend of spices used in curries. Traditionally every family would have their own Garam Masala, which is their own unique blend of spices they would use. It literally translates as Garam-Hot and Masala-Spices, but the term hot refers to the intensity of the spice rather than to the Chilli content or heat).
1 tsp Chilli Powder
(Add this gradually and adjust to suit your taste. Add more if you prefer it hotter)
1 tbsp Turmeric (Haldi) Powder
(In a supermarket look for Turmeric, if in an Asian store it will be called Haldi)
4 Bay Leaves
1 tsp Salt
150g Natural Yogurt
3 Fresh Tomatoes

1. Fry the meat in half of the butter until brown and set aside.
2. Fry the onions in the rest of the butter until golden brown. This helps give the curry its colour.
3. Add the garam masala, turmeric, chilli powder, garlic and ginger and stir until the aromas are released as the spices warm up.
4.  Add the tomato puree, bay leaves and yogurt and cook for 1 minute.
5.  Add the meat, chopped tomatoes, potatoes and salt and some hot water and leave to cook for 1 hour or until the meat is tender. At this stage it could be transferred to the slow cooker and left to get on with it. Don't add too much water, you can always add more as it is cooking. You want it to reduce to a nice thick sauce.

Serve with some plain boiled rice and Naan bread or poppadoms.

Please don't be put off by the list of the ingredients, once you have them you have many happy days of curry ahead. This is so tasty it is really worth giving it a go. Now relax and enjoy!


Friday, 5 April 2013

Hearty Lasagne and Greek Salad


This tasty, filling meal is really worth it. It is a bit of an assembly job and the individual parts do take time but you can speed it up with a food processor for the vegetables and a little helper to put the layers together at the end. Of course, if you have the time, you can dice the vegetables instead, although using the food processor also helps to disguise the vegetables for any fussy eaters out there. Don't worry the mince bulks it back up again so it is not like going back to pureed again. The crisp Greek salad really compliments the fuller flavoured Lasagne and little ones, if like mine, can pick out the bits of the salad they like (no leaves please Mummy!). It makes a great Sunday dinner or one for occasions and can even be made in advance and frozen for up to three months.

All you need is:

For the meat sauce -
2 Carrots
1 Tin of tomatoes
Pinch of Italian Seasoning (to taste)
1 Courgette
1 Onion
2 Cloves Garlic
500g Beef Mince
1 Stick Celery
1 Stock cube (I tend to use Kallo low salt for the little ones)
1 Pack of dried Lasagne sheets, ready to cook

For the white sauce-
725ml Milk
75g Butter
50g Plain Flour
Freshly grated nutmeg
1 Onion halved and studded with cloves
2 Bay leaves
Salt and Pepper

1. Begin by blitzing the carrots, courgettes, onions, celery and garlic in the food processor whilst heating the oil in the pan. 
2. Drop the veg into the oil and saute until soft. This doesn't take very long as the vegetables are quite mashed by the food processor. 
3. Drop in the meat, increase the temperature and break the meat up as you brown it.
4. Once the meat has browned add your Italian seasoning and tomatoes and bring to the boil. You want the mixture to be quite a dry one once cooked so it doesn't make the pasta too soggy so you can add some water now if needed but not too much as it will have to be cooked off at the end.
5. Turn heat down and simmer for about half an hour. If liquid is decreased enough pop a lid on.
6. Whilst the meat sauce is cooking you can start the white sauce. Melt the butter in a non stick, heavy based pan. Once melted add the flour and cook for a while to get rid of any floury flavour. 
7. Add a little milk and whisk to combine into a smooth sauce.
8. Add the rest of the milk and the other ingredients and turn the heat up to bring to a boil whisking all the time. Once at the right consistency (a thick sauce) turn off the heat and put a lid on to let the flavours infuse for about 20 minutes or until meat is cooked. You can lay some cling film straight onto the sauce to stop a skin forming if you are worried, but i find a good stir and you wouldn't notice it once assembled. After this time remove the onions and bay leaves.
9. Begin to assemble. You need a layer of meat sauce. then pasta, followed by white sauce. Do this again, until all is used up with a white layer on the top. Generously grate over a layer of Parmesan and bake at 180 degrees Celsius for 30-35 minutes until top is all melted and turning brown. 

If freezing, do so before putting in the oven. Defrost before putting in the oven at 180 degrees Celsius for around 1 hour or until hot all the way through and browning on top.


Greek Salad

1. Chop and wash some green leaves or take out of a bag if easier. 
2. Dice cucumber and halve baby tomatoes and sprinkle over.
3. Sprinkle with sweetcorn and top with large chunks of Feta, or just place the block on top.
4. Drizzle generously with Extra Virgin Olive Oil (the good stuff, not the cooking one) and sprinkle over a pinch of oregano (or do that on your own plate if LO's are not keen).
5. Relax and enjoy.

Thursday, 4 April 2013

Warming Sticky Sweet and Sour Pork Chops


 It is so cold and they call this Spring! When you are indoors with the heating still on or a fire burning in the stove, looking out of the window at the snow falling, yes snow, you know that you need something warm and comforting on the table at the end of the day. Out comes the slow cooker, in go the ingredients and voila, a few hours later a delicious meal. Of course, if you don't have a slow cooker this works just as well in a casserole dish, either in the oven (for longer cooking) or on the stove top (for a quicker fix).

A note on the slow cooker as we are on the topic. We asked for this as a Christmas present some years ago (I know exciting aren't we!), as we were both working long hours and wanted a 'proper' meal quickly when we returned home and have never looked back. You can't beat returning home from a long, tiring day at work in the bleak, mid winter (or Spring) when it is cold and dank, to the enticing smell of a warming, cooked meal and you don't need to lift a finger. I also purchased a slow cooker cookbook which I would recommend (New Recipes for your Slo Cooker by Annette Yates) as this demonstrated how versatile the slow cooker can be. It includes various recipes from soups and sauces to sponge puddings and chutneys.I have tried many of these and can vouch for their results. Slow cookers can be found in a variety of sizes relatively cheaply, I would recommend giving them a go for a quick and easy substantial meal. Here is one of my favourites:

Warming Sticky Sweet and Sour Pork Chops

1 tbsp Plain Flour
Salt and Pepper
A little oil 
4 Pork chops (excess fat trimmed off)
2 Onions finely chopped (or 1 large)
150ml vegetable stock (I tend to use low salt Kallo cubes)
4tbsp Soy sauce
4tbsp Tomato Puree
4tbsp Soft brown sugar
4tbsp Dry sherry
1 Green Pepper sliced
1 carrot chopped into matchsticks (or bought julienned at the supermarket)
4tbsp pineapple juice (from a tin, a sprinkle of chunks can be added from this at the end also, optional)
1 tin of stir fry vegetables (optional, these can be found with the oriental foods in the supermarket and contain beansprouts, water chestnuts and baby corn. If using add at the end and let heat through.)

This could be made using any meat of choice, or even mixed vegetables for a vegetarian option.

1. Sprinkle some flour into a bowl and season with salt and pepper. Coat the chops each side in the flour shaking off any excess.
2. Heat some oil in a frying pan and brown the chops quickly over a high heat on each side. Before placing in the slow cooker.
3. Add a little more oil to the frying pan if needed and cook the onions, pepper and carrot for about 5 minutes until golden brown. Stir in the other ingredients and bring to the boil. Pour over the chops in the Slow Cooker.

4. Cook on medium for 5-8 hours.
 5. Serve with some plain boiled rice or noodles.


This is such an easy dinner which really does itself. It is great for the kids, especially if they are not too keen on meat like my eldest. The Pork Chops come out meltingly soft and just fall apart which makes them one meat that she will actually eat willingly.


Monday, 1 April 2013

Veggie Night - Oriental Bean Burgers and Rice

About once a week we try to eat vegetarian. Not only is it healthier as there have been many studies about the effects of eating meat every day, but it is cheaper too. Often, just the idea of vegetarian food can be quite unpalatable let alone the thought of trying to get little ones to eat purely vegetables. 


This recipe is a very quick one and quite simple and is a great favourite in our household both with the children and adults alike.

In this case I served them with a sweet chilli rice, but they are also great like a burger in a bun with some salad and some relish.


All you need to do is take out the food processor. Add a tin of drained Oriental Bean Salad, 100g breadcrumbs, 2tbsp sweet chilli sauce, 1 egg and blitz together. Once mixed, mould into burger shapes and chill for about 30 minutes. 

Heat the oil in the pan and shallow fry the burgers in about 3tbsp sunflower oil for 3-4 minutes per side until golden brown and piping hot. 

Serve! Either in a soft white buttered roll with salad or as I did with Sweet Chilli Rice. The rice recipe was from Jamie's 30 Minute Meals (I did say it was a favourite,). This can be found on the link below.

http://www.channel4.com/programmes/jamies-30-minute-meals/episode-guide/series-1/episode-31 

 The added ingredients to the rice really make it more of a meal. A salad on the side of this makes it a refreshing, nutritional dish that really was enjoyed by all!

Wednesday, 27 March 2013

Sunshine Pie

Back to being Mum today with a meal on the table for 5pm, when we all sit down to eat. I would like to do something different and exciting, but know the rest of that roast chicken is lurking in the fridge calling out to be eaten. It does seem to be a bit repetitive with lots of chicken lately, but I would rather that, than to waste.

It is one of those crisp, cold days with clear blue skies which often allow that bright sunshine to filter through giving you a hint that spring really is on its way! It is this, that has inspired me to make a Sunshine Pie with the hope of  brighter, warmer times to come. The sunshine refers to the bright yellow colour of the filling made from carrots and red peppers all enfolded in a soft, flaky pastry. Enough to warm and comfort anyone on such a day.


This recipe began as a Pampered Chef ring recipe I saw demonstrated at a Pampered Chef party. There are many recipes for these on the internet and on the Pampered Chef recipe page. They use croissant dough to make the pie and are really so easy to do. In fact, as you can see from the pictures my nearly 4 year old trainee chef, 'P' did most of the assembly. Most of the recipes I could find were American, which meant conversion of some of the measures and some ingredients, which are not familiar here in the UK. So here is my twist on the recipe, you can be quite experimental with this and add what you like, but you do need quite a dry filling or you will end up with soggy pastry.

2 tins of Croissant Dough (these can be found in the refrigerator section in the supermarket, with the pastry. See image above).
50g Butter
3tbsp Flour
3 Carrots
1/4 Stick Celery
1 Garlic Clove
1/2 Red Pepper
1 Bay leaf
Cooked Chicken
1 Courgette
Milk
(You could also add half an onion or leek, or a couple of spring onions. Cooked bacon or ham would also taste good).
Preheat oven to 180 degrees Celsius.
  • Melt the butter in a heavy based pan. (It is important to use butter rather than oil so that it can thicken the sauce later when the flour is added).
  • Blitz, in a food processor, the carrots, garlic, celery, pepper and courgette. (And any other vegetables you want to add).
  • Add the vegetables and bay leaf to the butter and saute on a low heat to soften. You are not looking for browning. Cook for at least 20 minutes or longer, so long as it is a low heat.
  • Stir in the flour until the mixture becomes sticky and cook for a couple of minutes to remove any floury taste.


  •  At this point you could add any any bacon or ham you are using.
  • Add the milk a dash at a time and heat until it thickens, stirring all the time. If it gets too thick add a dash more milk, but you don't want it too wet. (See picture).
  • Stir in the chicken.

  • Open the croissant dough and lay triangles, slightly overlapping with points facing out onto a baking tray or stone.
  •  Place the filling in the centre in a neat circle.
    •  Lay the points of the pastry neatly over the top of the filling, quite tightly, working round in a circle so they are layered. Yes, this can be done by a near 4 year old!
    • Lift the inside edge of the pastry slightly and tuck the point of the triangle neatly under.

    • Brush with a little milk to glaze and bake in the oven at 180 degrees Celsius for about 30 minutes.

Monday, 25 March 2013

Work night dinner

Work night dinners are always tricky. When you are up in the early hours and all busy all day, it is sometimes the only quality time spent together. Everyone arrives home tired and hungry but it is difficult to muster the energy to put something enticing on the table. Here is just one solution that might work and is worth it:

Whilst relaxing the night before, pop a chicken in the oven for a couple of hours. We love a roast, especially chicken, but are not so keen on the splashes of oil all over the oven as it roasts. As a solution to this, it was suggested recently by a friend to put the chicken in a large casserole dish with a lid and roast. If need be you can remove the lid for the last half hour of cooking to brown, but mine browned with the lid on throughout. 
Hubby then did some mashed carrots and potatoes, gravy and peas.

This may not be the most awe inspiring dinner, but it was tasty, easy, quick and we all have full bellies. The leftover chicken can also be used later in the week for another dinner, watch this space!

Saturday, 23 March 2013

Best made plans - Quick, aromatic Oven baked Curry

British weather! Here I am all organised, set to return from Mums today. I have my chicken defrosting in the fridge ready to make something tasty with, when I awake to a winter wonderland. Yes, there beautifully coating the grass is a gleaming couple of inches of fresh snow. Was this forecast? I don't think so. Not being so keen on driving in the white stuff I delay the inevitable and leave later than planned to return home. As it happened I needn't have worried as there was hardly any on my homeward journey! So, returning layer than expected, what do I do with my chicken? Here is a quick fix.

I came across this recipe whilst hosting a Pampered Chef party (another story for another day, but I am now the 'Q' of kitchen gadgets). It is very quick to prepare and was enjoyed by all with all requesting the recipe. You can use what you have got, if you don't have it just leave it out, but using it all gives it a very authentic flavour. Making it the day before really marinates the flavours, but if like me today, you are in a rush just knock it up and enjoy! 

One baked curry which smells amazing


Quick Chicken Curry:

4/5 chicken breasts
1/4 jar masala paste ( I used Patak's Tikka Masala paste it only has ingredients I would use in a home cooked curry no artificial flavours or colours)
250g Greek yogurt
1 red onion
1 garlic clove
1 fresh green chilli
1 inch piece of root ginger
tin of tomatoes 
Bunch of fresh coriander
Juice of 1 lemon
2/3 tsp cumin seeds
Knob of butter

Heat the cumin seeds with the butter in the microwave until the seeds start to pop.
Mix all the rest of the ingredients and marinate if time.
Bake at 160°c for about 45 mins until the chicken is cooked through.

As you can see my dish will require a bit of soaking, actually thinking of trying this in a casserole dish next time.

Some links you might be interested in:

Friday, 22 March 2013

Mum's Home Cooking

So, here I am again relaxing whilst the grandparents take over bedtime duties. Yes, I have had a nice day off today and have had the luxury of being fed also. We arrived this morning armed with yesterday's left over soup, spinach pie and tarts for lunch which were all finished off. We then braved the cold to work up a bit of an appetite in the park before the feast Mum prepared. We had a traditional Anglo-Indian dish of ball curry (meatball, nothing weird going on here!) with yellow rice, salad and soda cakes (a type of flat bread made with yogurt). The soda bread is really worth a go, it is an old, highly coveted family recipe so this is indeed a rarity, it is really worth having a go at these, they are amazing.  The girls had the meatballs with a tomato sauce and penne although I must say P really tucked into the curry and rice even though it was 'spiky'! 

Soda Cakes:
These recipes are age old so measurements are guessed, if you want to have a go you may need to play around a bit, it is not one to try when you are in a rush but once you have made it, it is a pretty quick one. Here goes, in a large mixing bowl use around two mugs of flour, 2 level tsp bicarbonate of soda, salt to taste and natural/ Greek yogurt at room temperature. Add as much yogurt as it takes to make the mixture into a soft pliable dough. Leave this dough to stand for around 2-3 hours at room temperature.

These melt in the mouth accompaniments need to be eaten as soon as they are cooked, so when you are ready to eat roll into a small ball in your hand (use a little flour to prevent sticking), then sprinkle some flour onto a surface and roll out into a disc around 1/2 centimetre thick. Meanwhile heat oil in a frying pan, enough to deep fry, until very hot (little ones were banned from the kitchen at this point, too scary to think about). Lay one of the discs in and fry quickly until golden and starting to puff, turn over until that side looks golden and puffed to then place on kitchen paper to soak any extra oil. Serve immediately and watched them go! This is a firm favourite in our family, they are not greasy at all but light, fluffy and soft and great to mop up those curry juices with.


The curry was a two day job and very involved, Mum has her feet up now so I won't start grilling her on ancient recipes but I am sure this one will crop up again.

The girls had pasta meatballs which were very quick and easy:

Meatballs:

Use good quality steak mince and roll into balls. You can add more to these depending on what you have in the cupboard and how adventurous you are feeling. Herbs, dried or fresh always add great flavour and some add breadcrumbs (I keep a supply of these in the freezer, just blitz up and good quality bread you have that has gone a little dry and pop in a freezer bag, can be used from frozen). You can also add a beaten egg if you are having trouble keeping the balls held together. I always like to brown my meatballs in a little oil, no anaemic looking food round here, it also helps to seal in the flavour. Then set aside ready to drop into the sauce to cook later.

Tomato Sauce:

Saute the onions and garlic slowly over a low heat. If there are no herbs in the meatballs add some basil or oregano now. Add a tin of chopped tomatoes (the ones with herbs in can add some nice flavour too). And there you have it a home made pasta sauce the kids will love with none of the nasties some of the jars can contain. If a little acidic add a little sugar to counter. 

Cooking with Kids:

P has really enjoyed making her own meatballs before although you have to be absolutely scrupulous over hygiene, not only the hands washed before cooking but be careful if breaking eggs and handling raw meat as both can be dangerous if ingested. Despite this P is now a bit of an expert as she would put it Peppa Pig style!

Have a great weekend and let me know if you give it a go! 

Thursday, 21 March 2013

Lunch and Dinner!

So, today was one of those crazy days with friends over for lunch and a dinner to sort. Somewhere in there I wanted to use the bag of spinach I opened the other day in the fridge and knew was slowly wilting but knew it had to be used in a way my eldest 'P' wouldn't notice too much. After dropping P at nursery rushed back to try as and get the house somewhat presentable decided on a quick bean and pasta soup, a basic cheese and tomato pizza and a salad with some little orange tarts for pudding. 

For the soup:
Saute onions and garlic slowly on a low heat for about 20 mins until soft and aromatic. Sprinkle in a pinch of dried basil and stir until warmed and releasing it's fresh aroma also. Add a tin of chopped tomatoes with one teaspoon of sugar to cut through the acidity and a tin of haricot or cannelini beans, if a bit dry add some water. Cook on low for about 20 minutes although it really doesn't matter if you leave it longer. You can at this point blitz half the mix in a food processor or with a stick hand blender which will leave some whole beans, but I blitzed all of it, less faff and thought P might complain about 'lumps'. Add macaroni or soup pasta (or, when desperate have even just used normal pasta, it is just a bit chunkier) and water, simmer until pasta is cooked (10-15 minutes). Add more water if needed to make a good soup consistency. I usually serve a little thicker than usual so little ones can spoon it easier. This soup makes a filling dinner also with some rustic bread. At the table grate some Parmesan over. 

For the pizza:
I jazzed it up with some sliced mozzarella and red pepper topped with salami.

Tarts:
These were actually from Jamie's 30 Minute Meals which is a great book. I have made some of the meals in 30 minutes, but usually pick and choose bits and pieces from different menus. The tarts used ready made pastry with a vanilla creme fraiche filling and literally took minutes to make and 10 minutes to cook (and seconds to devour!). http://scrapbook.channel4.com/programmes/jamies-30-minute-meals

Lots of bowls cleared and full stomachs yum yum. 

And with all that done it was time to think about dinner, yes hubby would soon be home a rummaging around the kitchen for food. I decided on a quick spinach and feta tart, or Spanakopitta as it is called in Greece where I first fell in love with this dish. Yes, a bit of a pastry overload but the spinach had to go!

For the spinach tart:
Saute one onion (finely chopped) with one garlic (chopped or crushed), one bag of spinach (washed) and a sprinkle of oregano until soft and wilted.
Take off the heat to cool. 
In a bowl beat 4 eggs, one tub of ricotta and one block of feta crumbled. Add salt, pepper and a little powdered or grated nutmeg. 
Add the spinach mix to the egg mix and stir.
Take a pie dish, lay 3 sheets of filo pastry in the bottom brushing each with melted butter before laying the next (if you have time). Spoon the pie mix into the middle, either fold the bottom pieces over the mixture, or lat more sheets on top. Brush the top with melted butter (this is a must). Bake at 200°c for 30 minutes (maybe set the timer for 20 and keep an eye). 

For pudding we had strawberries and Greek yogurt with honey. 

Happy cooking